An essential component of a school’s response to an emergency is the reunification of students with their parents or guardians. Not only is it important for schools to account for all students during an emergency, but they must maintain the chain of custody of these students during and after the incident.
The reunification process, especially in a large school, can be a daunting task. We created ReunifyMe to streamline this process by making it quicker and more efficient. Students get reunified with their primary caregivers without the need to search through piles of papers. Because the reunification platform can be accessed from a computer or mobile device, the student’s and parent’s status can be quickly identified in real time and reviewed at a later date if there are any questions as to what transpired during or after the incident.
In this article, we discuss the process of reunification with the ReunifyMe system. But first, we discuss several items that you should consider when preparing for reunification following an emergency at your school.
Preparing for Reunification
The first thing you will want to do is to make an Emergency Student Reunification Plan (“ESRP”). It is important to have a plan in place so that everyone knows exactly what to do in the event of an emergency at your school. You should communicate your ESRP with your parent community. You may want to send a letter to all parents and guardians each year advising them of the student collection process and possible reunification sites. You can also advise them not to come to the school as they may impede emergency responders and not to call the school because they may tie up the phone lines. You should also advise parents and guardians that they must bring ID to pick up their children;
Your ESRP, at a minimum, should include: (1) the off-site reunification locations, (2) the organization of the reunification site, (3) the members of your Reunification Team and (4) the process of reunification.
Reunification Site/Location
First, identify off-site locations that would be suitable for reunification. Often these sites include nearby schools, but they may also include other facilities such as churches and recreation centers or even outdoor areas such as parking lots or ball fields. Regardless, the site must be large enough to accommodate the entire student body, all school staff, parents and guardians and any additional volunteers. Written agreements should be in place with any non-school sites. The Memorandum of Understanding (MOU) should be reviewed annually.
If possible, floor plans of the reunification site(s) should be included in the school’s ESRP and placed within a “reunification go-kit.”
Organization of the Reunification Site
Your reunification site should have at least three (3) distinct areas: 1) Parent Check-in Area; 2) Family Waiting Area, and 3) Student Staging Area. Designate a different person to be in charge of each area and a team to assist in each area. Students can be divided up and grouped by grade level within the Student Staging Area. You will need “Runners" to retrieve students from the Student Staging Area and bring them to the Family Waiting Area to be reunited with their families.
In the past, you would need pencils, release forms, clipboards and other supplies at each reunification site to assist with the reunification process. But with Share911, the need for all of these supplies has been replaced by computers and mobile devices. If possible, when leaving the school during an emergency, staff members should try to bring a laptop or mobile devices (anything with a web browser), extra charging cables and power strips.
Reunification Team
You will need to designate a district-wide Reunification Team. This team may consist of staff members at all schools in your district as well as the school district offices or board of education. Ideally, the members of your Reunification Team would include individuals who operate well under pressure, such as crisis counselors and nurses. The members of the Reunification Team will be the members of the ReunifyMe channel. You should designate several individuals to be the team leaders who will issue the reunification alert.
If there is only one school in your district, then all staff members at the school should be members of the ReunifyMe channel.
Make sure that your Reunification Team members have access to your schools’ SIS (Student Information System). This information will be used during the reunification process to verify the parents and guardians.
Reunification Process - ReunifyMe
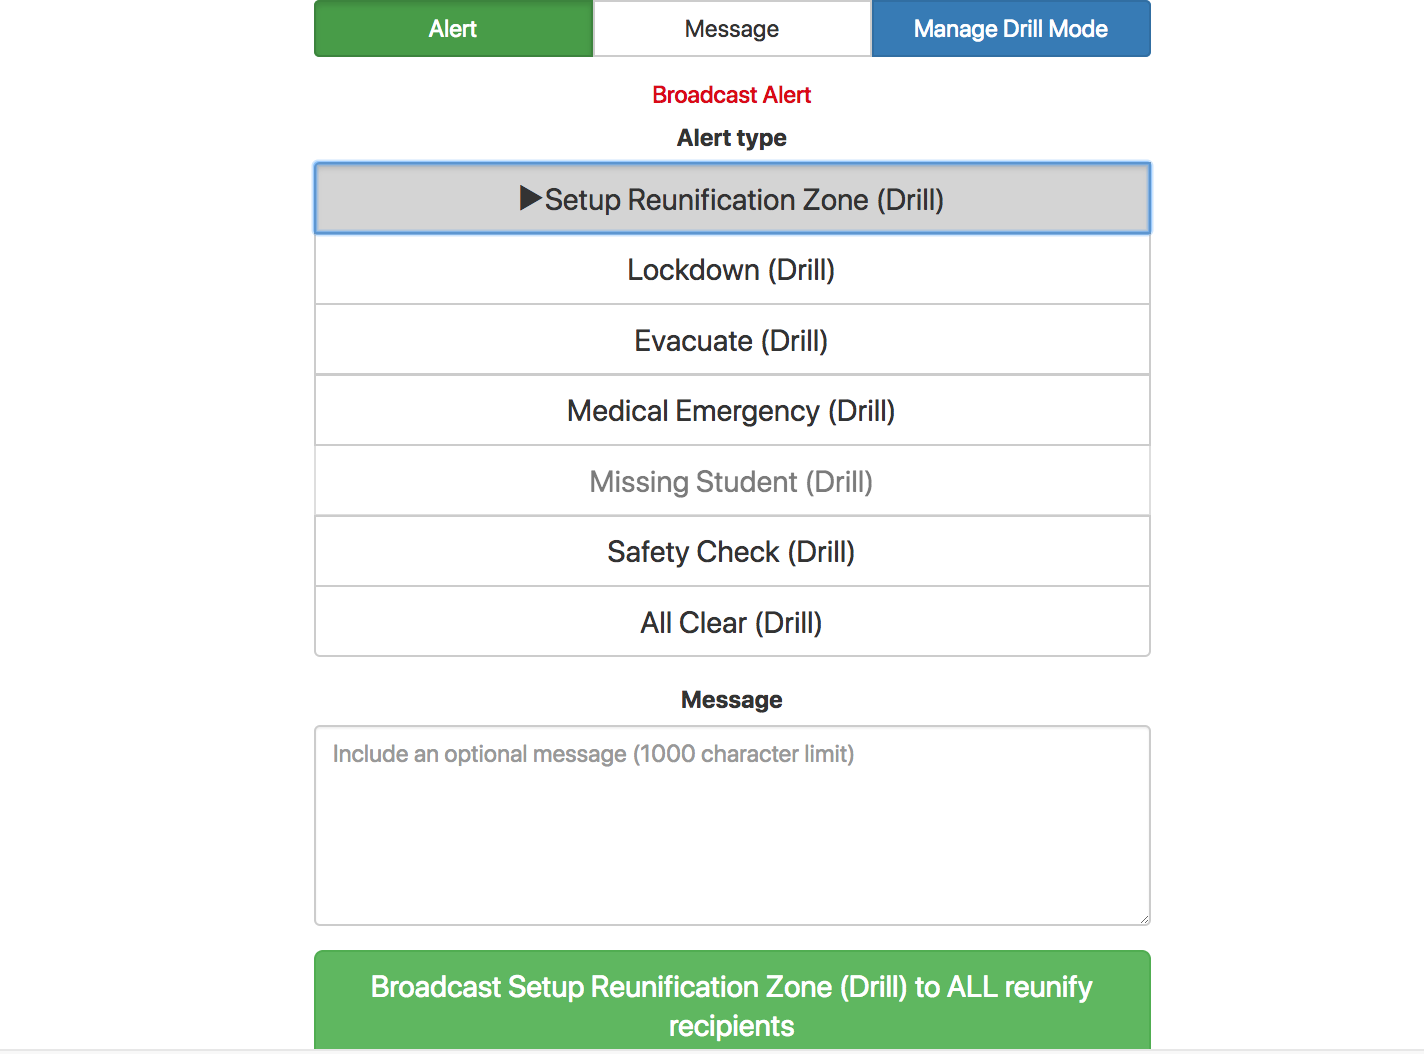
The reunification process starts by a member of the Reunification Team broadcasting a “Set Up Reunification Zone” alert from ReunifyMe Channel. They do this by opening up the ReunifyMe channel and clicking on “Set up Reunification Zone.” You can enter a message in the box provided and then click on “Broadcast Setup Reunification Zone to ALL reunify recipients.”
All members of your ReunifyMe channel will receive this message and know to begin the reunification process. The Reunification Team then goes to the designated Reunification Site and prepares for the students and staff arrival.
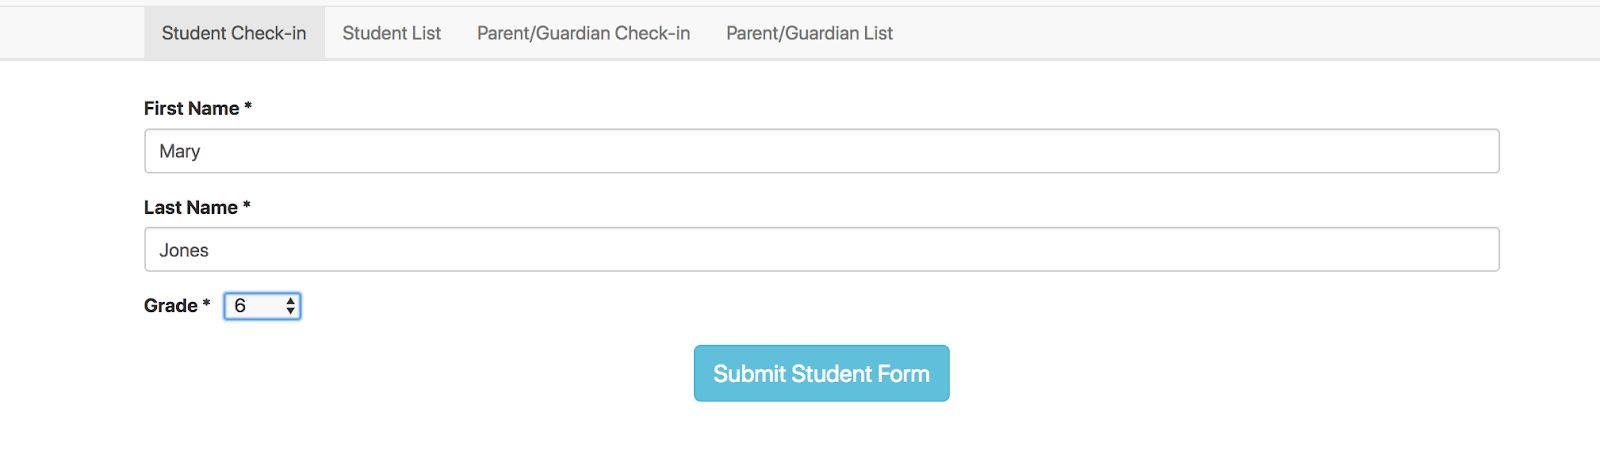
Once the students and staff arrive at the Reunification SIte they should be organized in the Student Staging Area. The members of the Reunification Team then begin entering the students’ names and grades into the system and click on “Submit Student Form.”
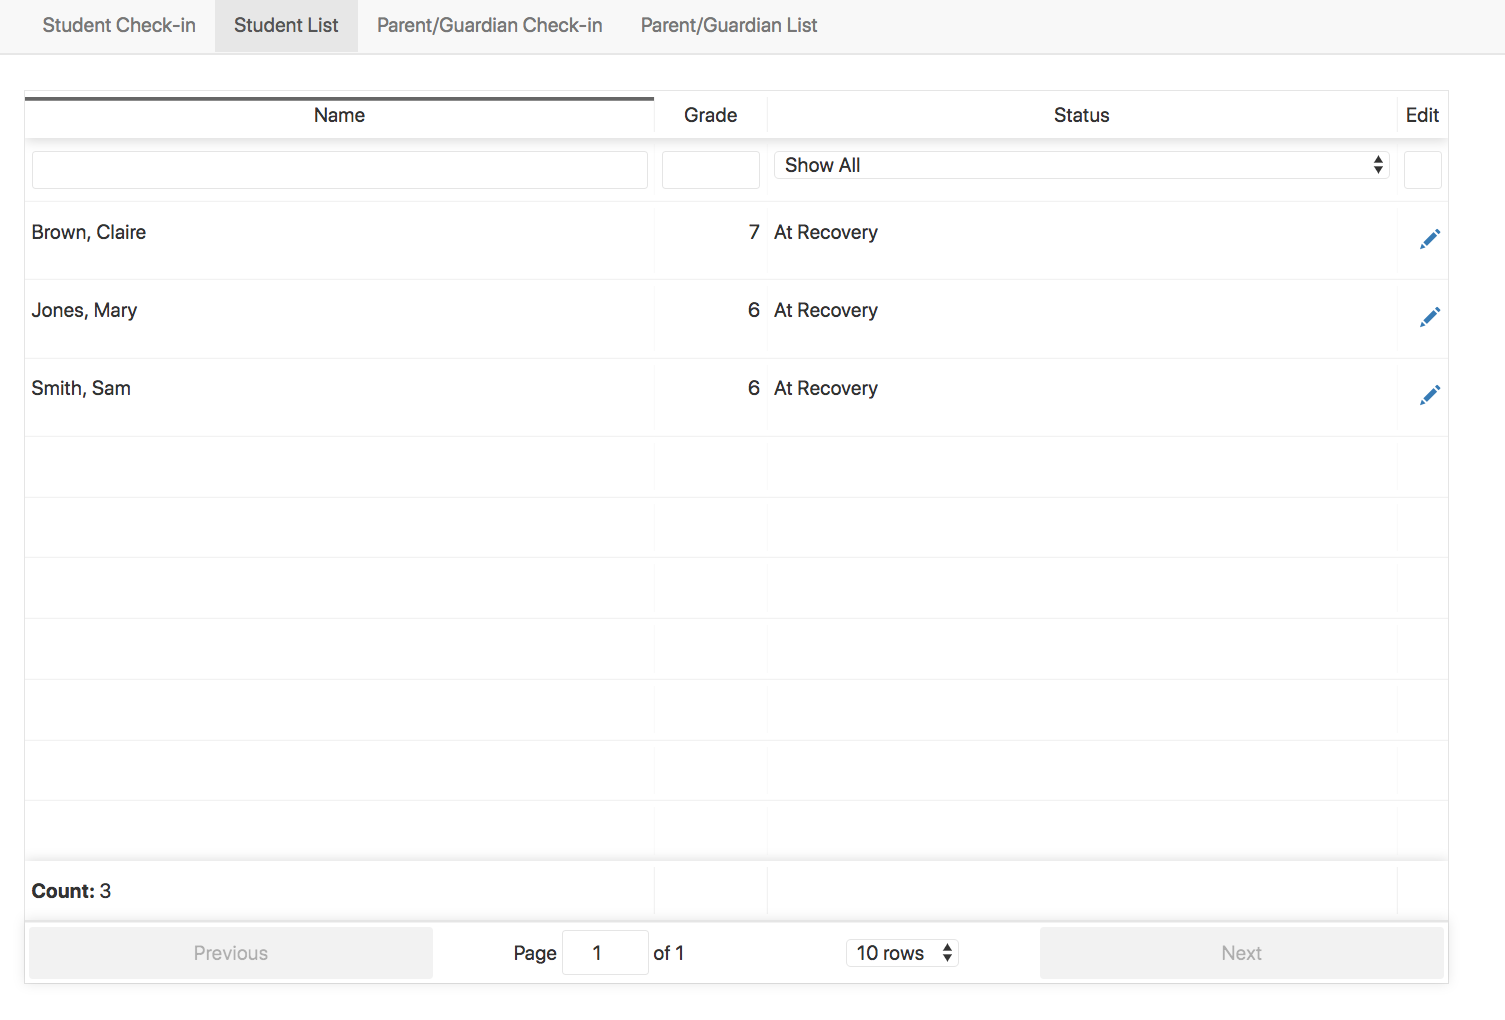
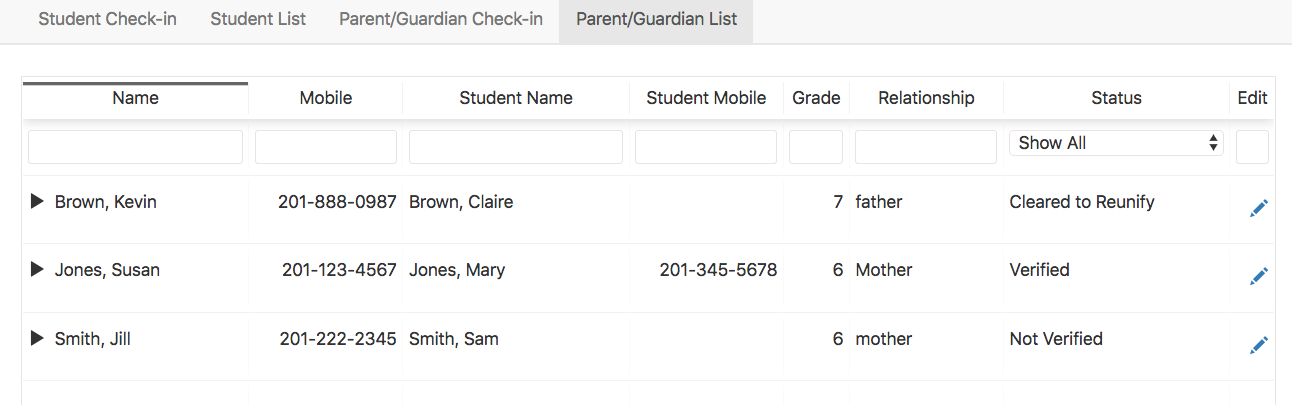
When you click on Student List you will see the real-time status of each student that has been entered into the system. This information can be filtered so that you can view all the students who are at recovery and those who have been reunified.
While you have several members of your team checking in students, you should have several members of your team checking in parents. There are three (3) ways that parents can check in:
(1) You can direct parents and guardians to register themselves when they arrive at the Reunification Site by going to reunifyme.com and entering a custom code (you can tell us what you would like that code to be). Once they enter the code, they are taken to a form to fill out. They then enter their name, cell phone number, relationship to the student, student’s date of birth, grade and student’s cell phone number. They then click on “Submit Reunification Form” and the parent is registered.

(2) If a parent is unable to register on their mobile device then you can make computers and kiosks available for them to do this.
(3) A third option is to have members of your Reunification Team sitting at computers, or on mobile devices walking through the crowd, registering the parents.
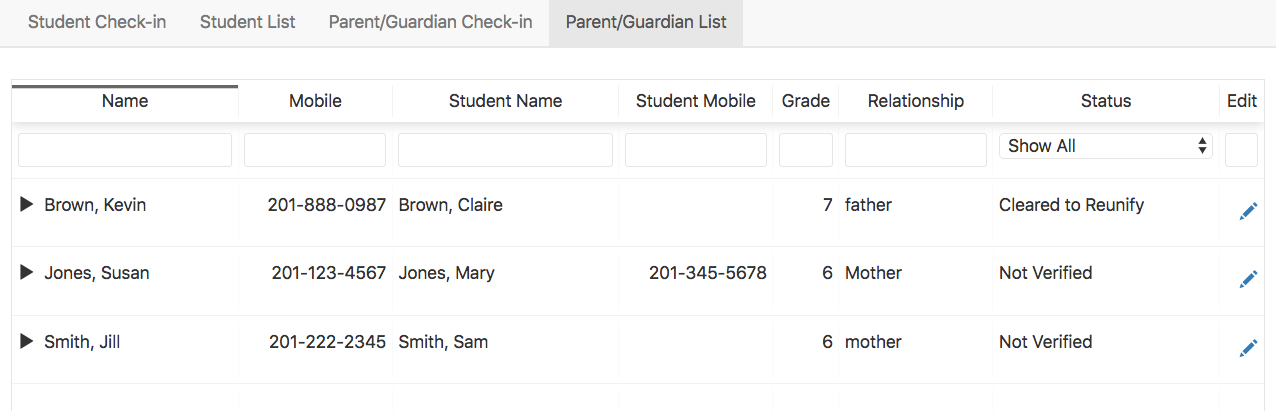
When you click on the Parent/Guardian list you will see that the status of the parent is “not verified.”
Verification is the process of ensuring that a certain adult is authorized to pick up a student. You can have a verification team (presumably members of your Reunification Team) working anywhere in the district (they do not have to be at the Reunification Zone). These individuals should have access to a computer (or mobile device) that is tied into your SIS (Student Information System) so that they can verify the parents/guardian. Once they have determined that an adult is authorized to pick up a student, they click on “Verify Parent/Guardian.”
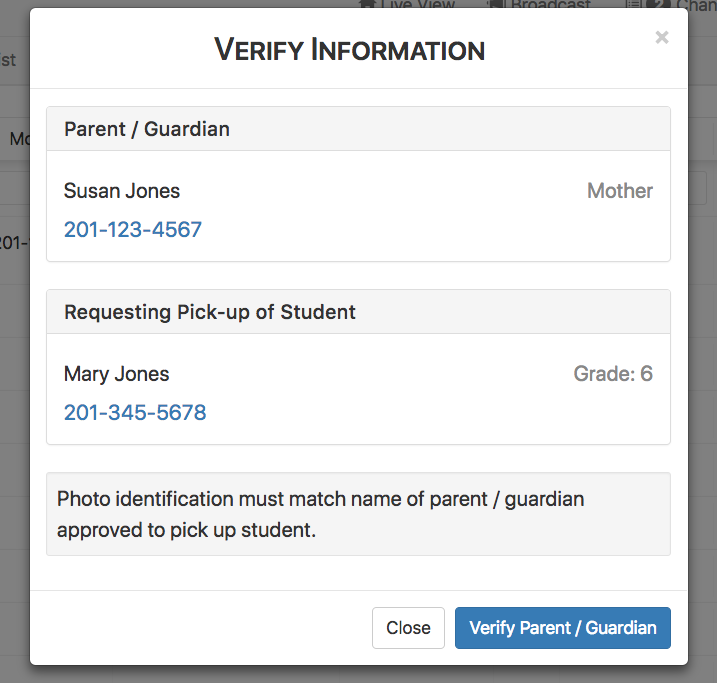
The status of the parent then changes to “Verified” on the parent list.
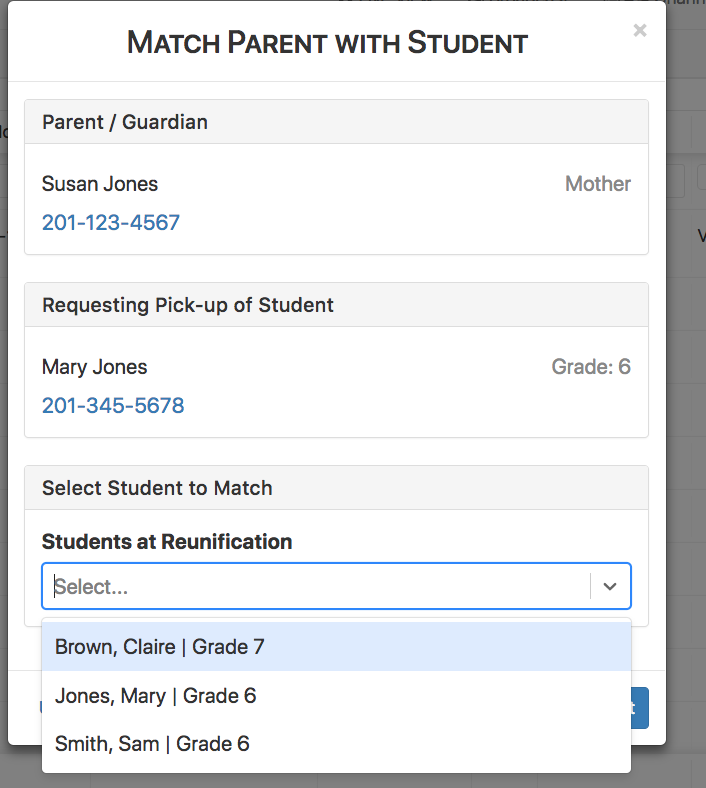
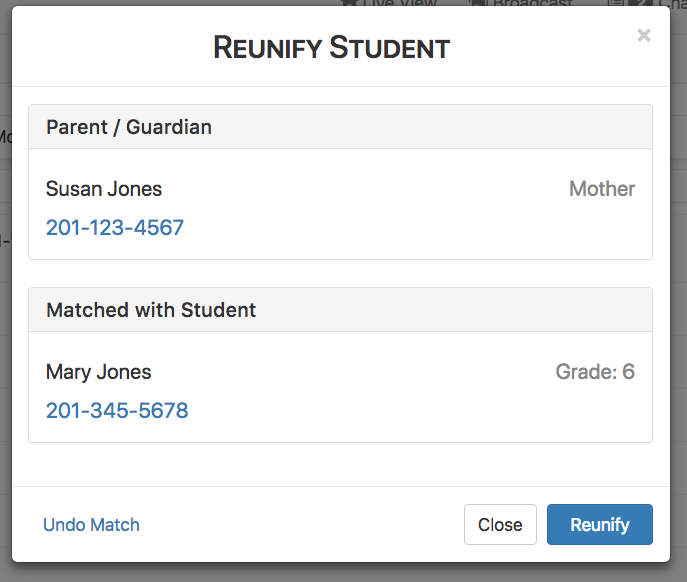
When you click on “Verified” (under status) you can match the parent with the student. Select “Students at Reunification” and you will see the students names and grades appear. The adult may be authorized to pick up more than one student. That is why we have the matching process.
After you select the student(s) and go back to the Parent/Guardian List, you will notice that the status has changed to “Cleared to reunify.
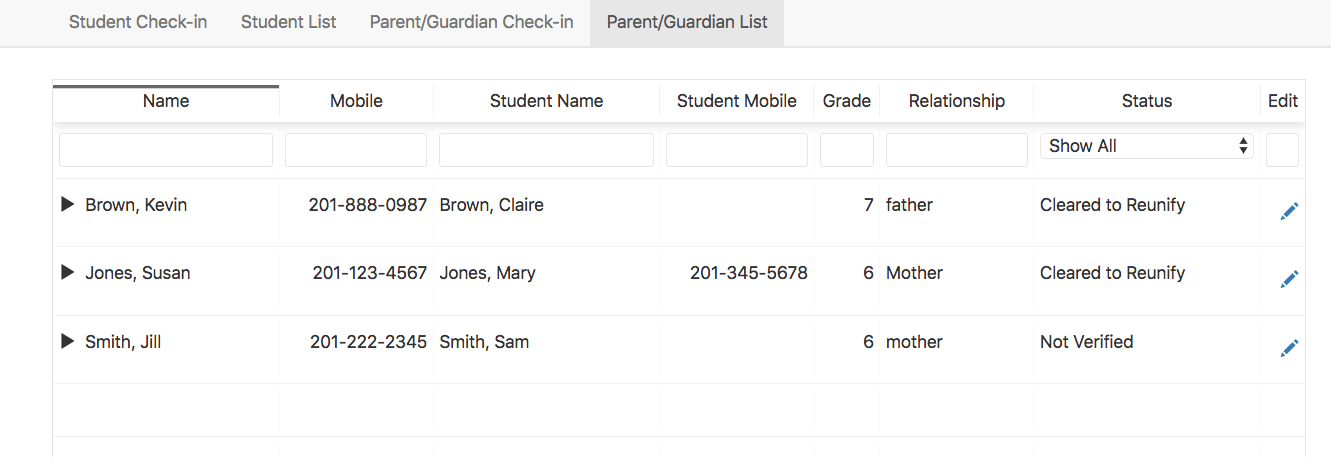
Now it is time for your runner team, the staff who are in between the students and the authorized parents and guardians, to start reunification. They can look at the information on the system and see all of the students who are cleared to be reunified with their parents and guardians. Because we have the parents’ and students’ cell phone numbers in the system, it makes it very easy for the runners to get in contact with them by either texting them or calling them and arranging a location to meet. If the student does not have a cell phone then the runner recovers the student from the student staging area and brings him or her out to the family waiting area. Once the student has been handed to the parent or guardian, the runner clicks “Cleared to be reunified” in the Parent/Guardian List and then clicks on “Reunify” in blue and the process is complete.
When the incident is over you can access an after-action report that will detail everything that transpired during the reunification process.
