Adding, Removing, or Relocating Employees
Adding, removing and relocating employees to a new Share911 channel is an easy process and involves just a couple of steps. This can be done by any Share911 system administrator with Manage Users Permission.
Adding New Members Using the Invitation Method
1. Sign into Share911.com, select the channel you want to invite staff.
2. Click your Name or Menu in the upper right corner
3. Select “Manage People” from the drop-down menu
4. Click “Invite New People”
5. Enter their email address and then click Send Invitations (You can also click the button to the right for bulk invites)
That's it, the employee will receive an invitation, complete their profile and be on Share911!
Removing Employees
You can remove employees by following these steps:
1. Sign into Share911.com and select the channel that you want to remove staff from.
2. Click your Name or Menu in the upper right corner
3. Select “Manage People” from the drop-down menu
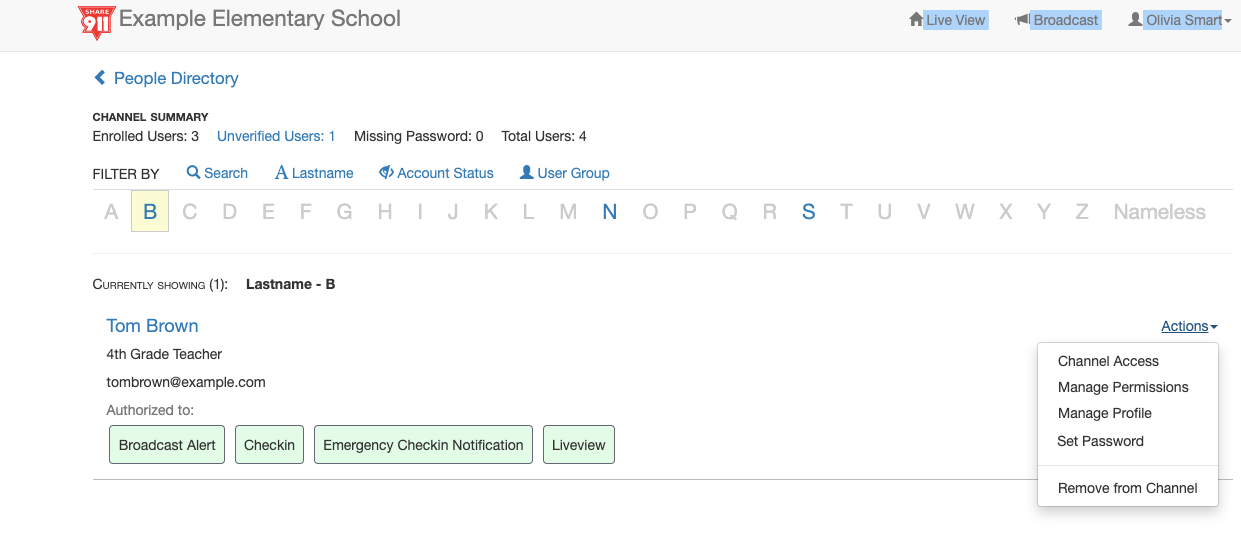
4. Click “User DIrectory”
5. Either type in the person’s name or click “Last Name” and click the first letter of the person’s last name
5. Click Actions to the right of the person’s name
6. Click Remove Person, and then OK

Note: People who are members of multiple channels (schools, buildings) will need to be removed from each channel that they belong to.
Relocating Employees
Do you have employees that work in multiple buildings or changed buildings?
Employees can only self-register for one building, so you’ll need to add them to additional buildings.
You do this by using the Channel Access option:
1. Sign into Share911.com, select the correct channel, then click your Name or Menu in the upper right corner
2. Select “Manage People” from the drop-down menu
3. Click “User DIrectory”
4. Either type in the person’s name or click “Last Name” and click the first letter of the person’s last name
5. Click Actions to the right of the person’s name
6. Click Channel Access, select the buildings, click Save Changes

